Manual Mode: The Ultimate Guide for Beginner Photographers


Oct 18
When I got my first DSLR I had no idea what to do with it—and I knew nothing about shooting in manual mode!
It was 2008 and I had just purchased a Nikon D80 with kit lens. I had been inspired by a local wedding photographer. I had stumbled across their blog and thought “ooooh I can do that.”
Ooooh was I wrong! I had got the “fancy” camera but I had no idea how to use it.
For the better part of a year I relied on turning a little dial with different icons on it to select my camera’s settings. There was a little flower for macro shots. There was something resembling a night sky for what I assumed were “dark” shots. And there was a guy running for… action shots?
(If you’re smacking your forehead right now, that’s ok – I totally agree. And if you’re thinking “hey that’s what I do…” then keep reading, sister, cuz this post is about to rock your world.)
Really, I was lost. My photos were dark, they were grainy, they were out of focus. And they looked nothing like the images that had inspired my foray into photography.
My ‘Aha’ Moment: Manual Mode
It wasn’t until I received a book about wedding photography as a Christmas present and stumbled across the mention of manual shooting that a light bulb went off.
I knew that if I wanted to actually create the images I dreamed of I needed to learn how to shoot manually. So I dug through the internet looking for information, set my camera to “M” and never looked back.
I taught myself through a lot of trial and error. And for the last 7+ years I’ve shot in manual mode 99.9% of the time.
Why Learn to Shoot in Manual Mode?
If my own experience above hasn’t already convinced you, believe me when I say, you must understand how to shoot manually to have complete control over your image creation.
In fact I’ll be so bold as to say that if you dare call yourself a professional photographer you’d better know how to shoot manually. Otherwise you’re just letting your camera do the work – and you’re at the mercy of what it decides.
That’s not to say that you have to shoot in manual mode all of the time. I know plenty of pro photographers who will use A-Priority, etc. during hectic bits of a wedding day or shoot. But you must UNDERSTAND the components of manual shooting to comprehend when images aren’t turning out how you want, and then be able make adjustments.
Personally, I’m a control freak when it comes to my art – and I’m guessing you are too. I shoot in manual mode all of the time because I know it’s the only way to produce the exact image I want. And I’ve been doing it for so long that it’s now second nature to me. It can be for you too.
I constantly have beginner photographers asking me how to shoot and how to use their new brand new cameras. So, luckily for you, I’ve decided to write this crash course in Manual Shooting complete with graphic “flash cards”… Buckle up!
How to Shoot In Manual Mode
To understand and shoot in manual mode you will need to understand the three basic pillars of exposure. I like to consider these my artist’s tools or medium – just like a painter’s paint. And they all work in a delicate balance to create your ideal image (like blending the perfect shade of paint). These three elements are Shutter Speed, Aperture, and ISO.
Understanding Shutter Speed
The name says it all. Shutter speed is how fast the shutter on your lens closes which affects how much light reaches your camera’s sensor. Basically, the longer your shutter stays open the more light is able to enter. Therefore:
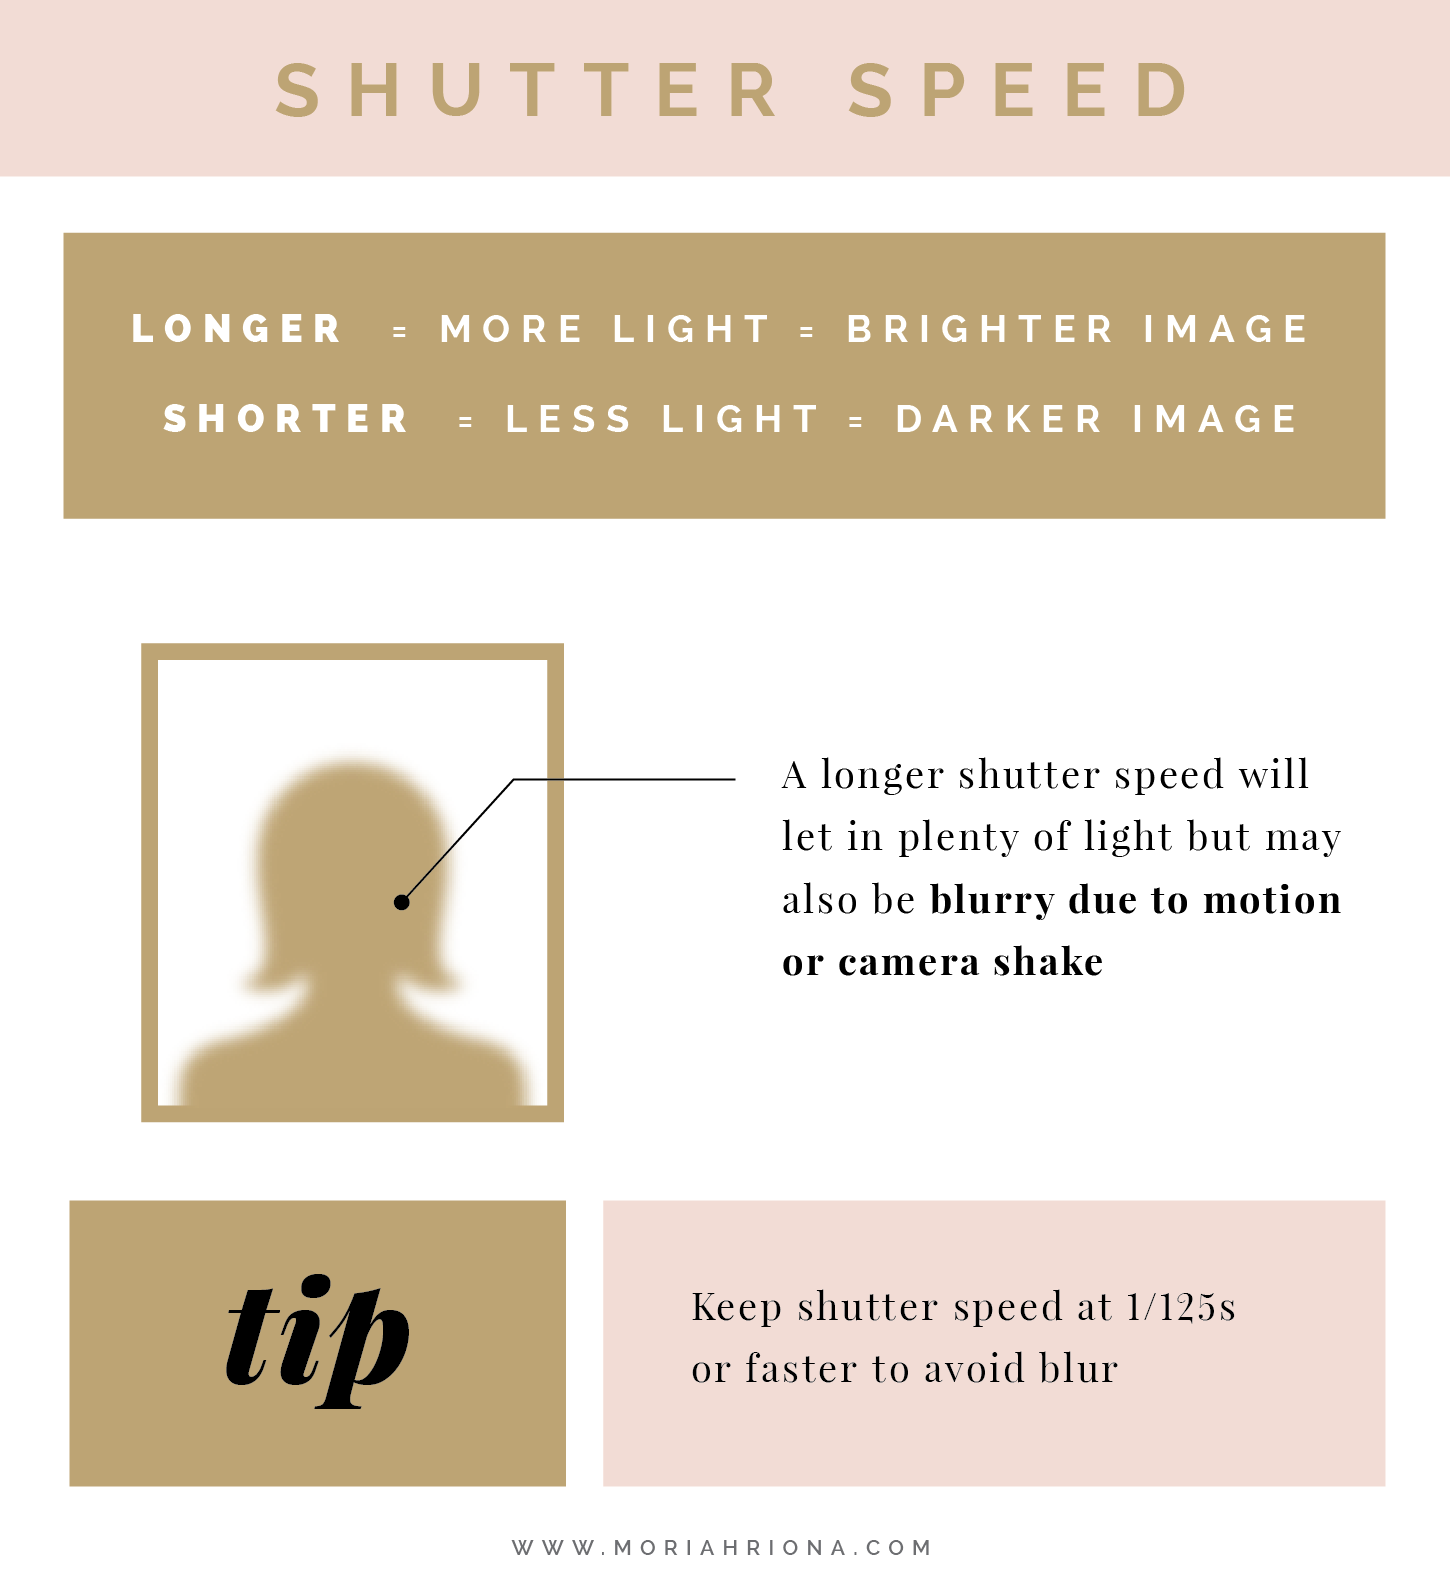
Longer Shutter Speed = More Light = Brighter Image
Shorter Shutter Speed = Less Light = Darker Image
Have you ever been in a relatively bright area but your shutter stayed open a long time and the resulting “image” was a completely white screen? That’s because the shutter stayed open too long, too much light entered the lens and the resulting image was totally “blown out.” Or maybe you’ve been in a dimly lit area, your shutter snapped shut really quickly and you ended up with a completely black screen? Same concept but in reverse.
As a wedding photographer, it seems that much of the day can be spent in dimly lit areas and you’re constantly struggling to get more light. So why not remedy this by simply having a longer exposure (longer shutter speed) for all those dimly lit images?
Well, the issue is that while a longer shutter allows more light to hit the sensor, it also allows the image to capture more motion – or essentially, blur.
Imagine you’re photographing a child running – a longer shutter will let in plenty of light but also the child will look blurry in the image. Sometimes this is a desired effect to indicate motion but most of the time we’re looking for tack sharp images.
Another consideration is that even when your subject is still, a shutter open too long can cause a blurred image simply from the slight shake of your hand. Keeping this in mind I always try to keep my shutter speed at 1/125s or faster (usually closer to 1/200s).
Now, that’s all great but sometimes, especially at an indoor wedding venue, 1/125 s doesn’t let enough light in and I don’t want dark photos. Fortunately I still have 2 other tools – Aperture and ISO – to create the exposure I need.
Understanding Aperture
Aperture is the next tool in my exposure toolbox and it’s actually my personal favorite for creating effect in my images.
To understand aperture you should think of your own eyes. When it’s dark your pupil dilates (opens wider) to allow more light in and similarly, when you’re outside on a sunny day, it constricts and gets very small to let less light in. The same concept applies to your camera lens.
A wider (bigger) Aperture = More Light
A smaller Aperture = Less Light
Seems simple enough, however this concept comes with a little caveat: Many beginners get confused when talking about big or small apertures because aperture is measured in “F-Stops” and the smaller the number for the F-Stop the bigger the aperture.
What??? For example, f/1.4 is a very wide aperture and f/32 is a very narrow aperture. It kind of makes you want to pull your hair out when you first start – but fret not, friend, you’ll get the hang of it.
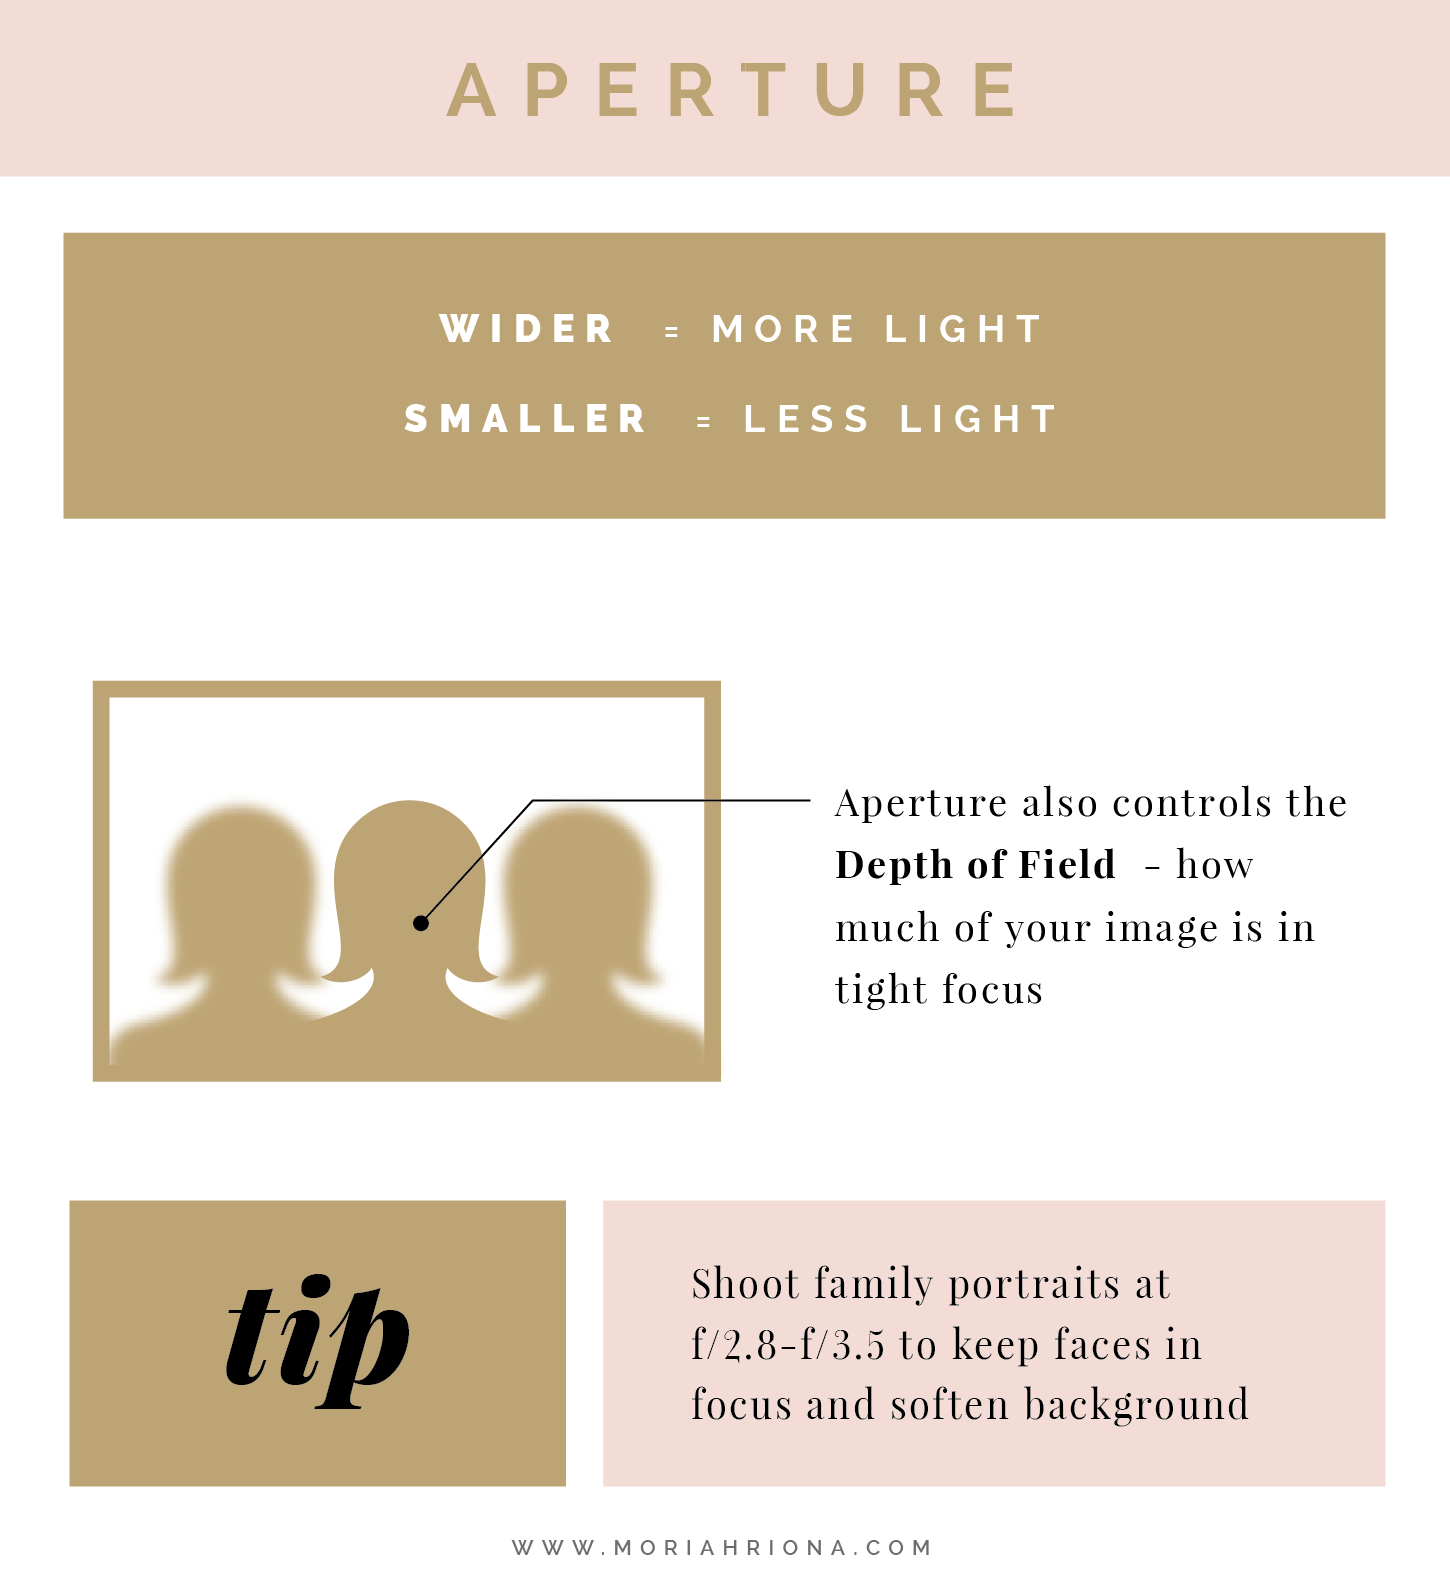
Now, I mentioned that aperture is one of my favorite tools and here’s why – in addition to controlling the amount of light let in, your aperture also controls the Depth of Field of your image.
Depth of Field
Depth of Field (DOF) is a term to explain how much of your image is in tight focus. I tend to shoot very open (wide aperture) at weddings because I like the dreamy/romantic look achieved by a “shallow depth of field.” And I also have the added benefit of allowing a lot of light into the image (again, weddings locations tend to be pretty dark).
So, why don’t I shoot at the widest aperture all of the time? Well, it’s not ideal to have a shallow depth of field in every situation. Take for example family portraits during a wedding.
If I shot family portraits “wide open” at f/1.4 only one small piece (perhaps one family member) would be in sharp focus – due to the shallow depth of field. But I also don’t want everything in the image to be completely in focus – I want to draw focus to the most important part (the family) and slightly blur the rest (the background). Because of this I typically shoot family portraits at f/2.8-f/3.5.
So, let’s say you’re shooting with as low a shutter speed as you can without creating motion blur, your aperture is as wide open as you want to still allow the right depth of field but your photos are still coming out dark. What to do? Well, fortunately, you still have one tool left to boost your exposure – ISO.
Understanding ISO
ISO is my last exposure tool and a sort of “last resort” when it comes to shooting in dark settings. Before digital cameras, ISO determined how sensitive your film was to light. You would have to buy film with different sensitivities (ISO) depending on your lighting situation and finish a roll or just change it if you wanted a different ISO.
Sound like a pain? Yeah. Fortunately, today’s digital cameras utilize the same principle but you can change your ISO with the twist of a dial. Instead of measuring film sensitivity, ISO measures the sensitivity of your sensor in a digital camera.
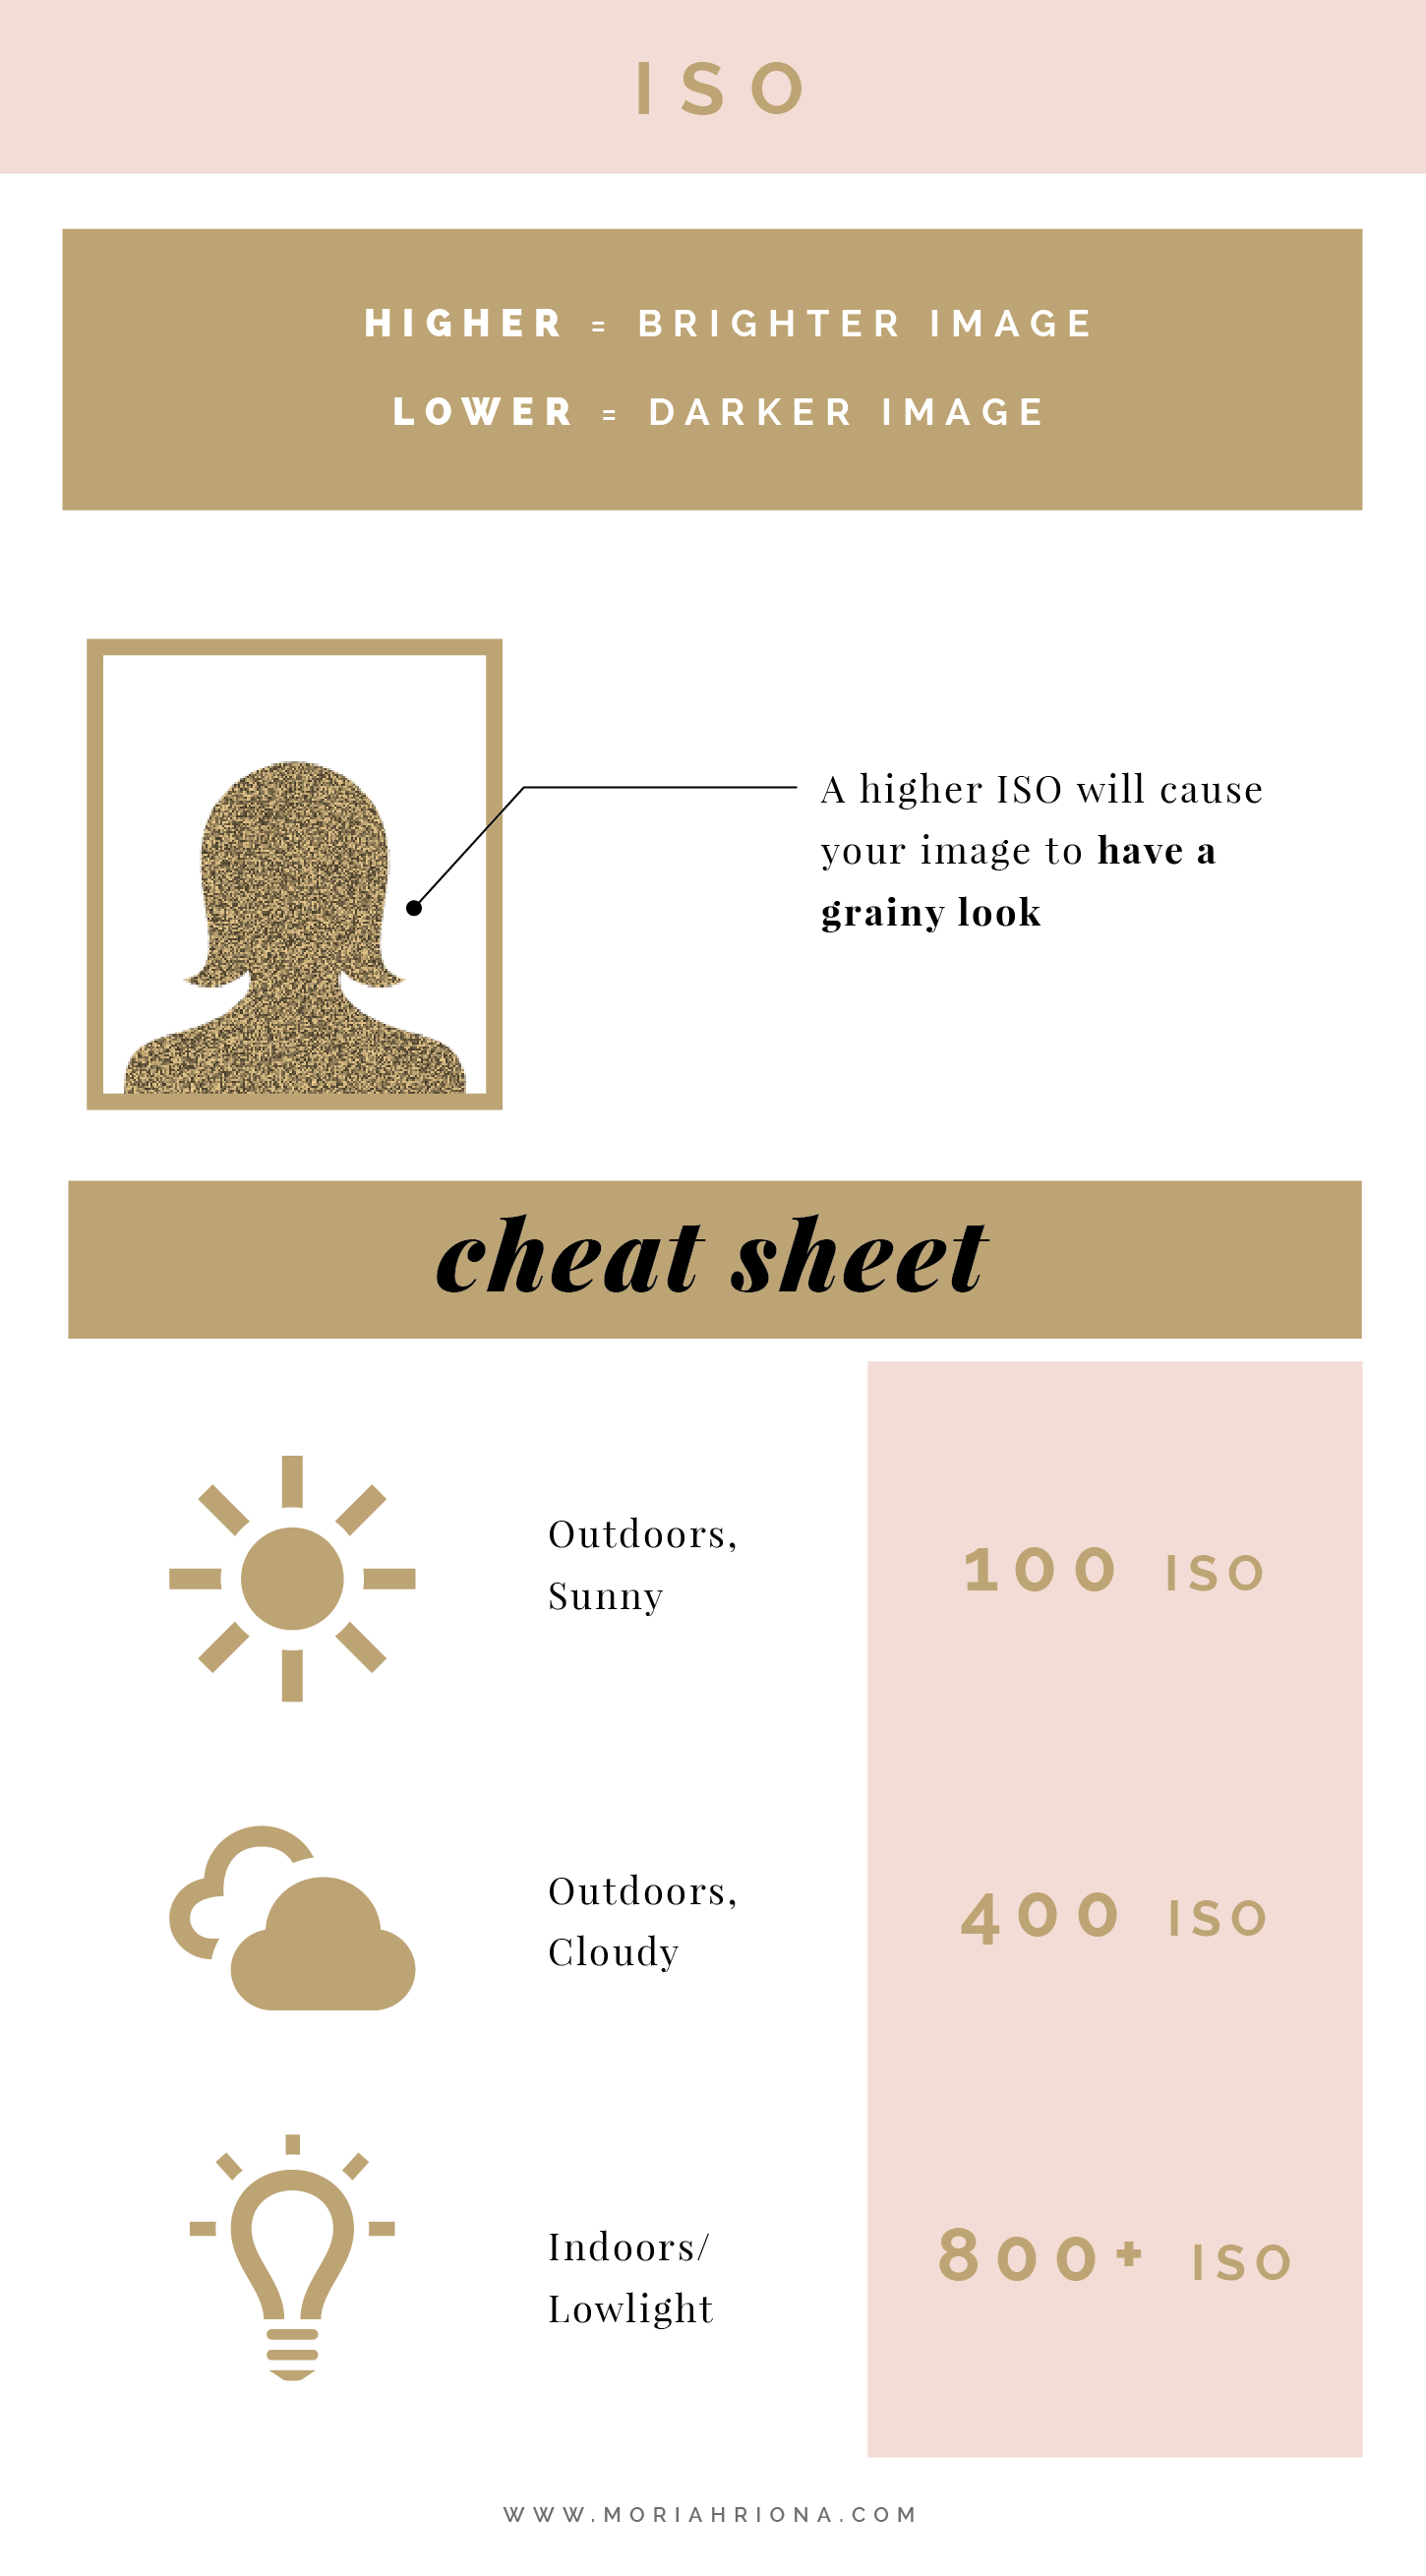
A higher number for your ISO will mean a brighter image. So crank that baby up, right? Well, not so much. As you may have noticed by now there are benefits and drawbacks to each of these exposure tools.
As you creep higher up the ISO scale your image will start to have a grainy look – just like old film used to. Except this time it’s digital noise. Sometimes the grain can be a desired look, especially in black and white images. However, I’m personally not a fan of the grain. That’s why I consider ISO a “last resort.” I turn to it when I’ve already adjusted my shutter speed and aperture and still have dark images. So I usually only adjust the ISO during the typically dark parts of a wedding day (i.e. getting ready, indoor ceremony, reception, etc.)
However, I’m personally not a fan of the grain. That’s why I consider ISO a “last resort.” I turn to it when I’ve already adjusted my shutter speed and aperture and still have dark images. So I usually only adjust the ISO during the typically dark parts of a wedding day (i.e. getting ready, indoor ceremony, reception, etc.)
Manual Mode: The Exposure Trifecta
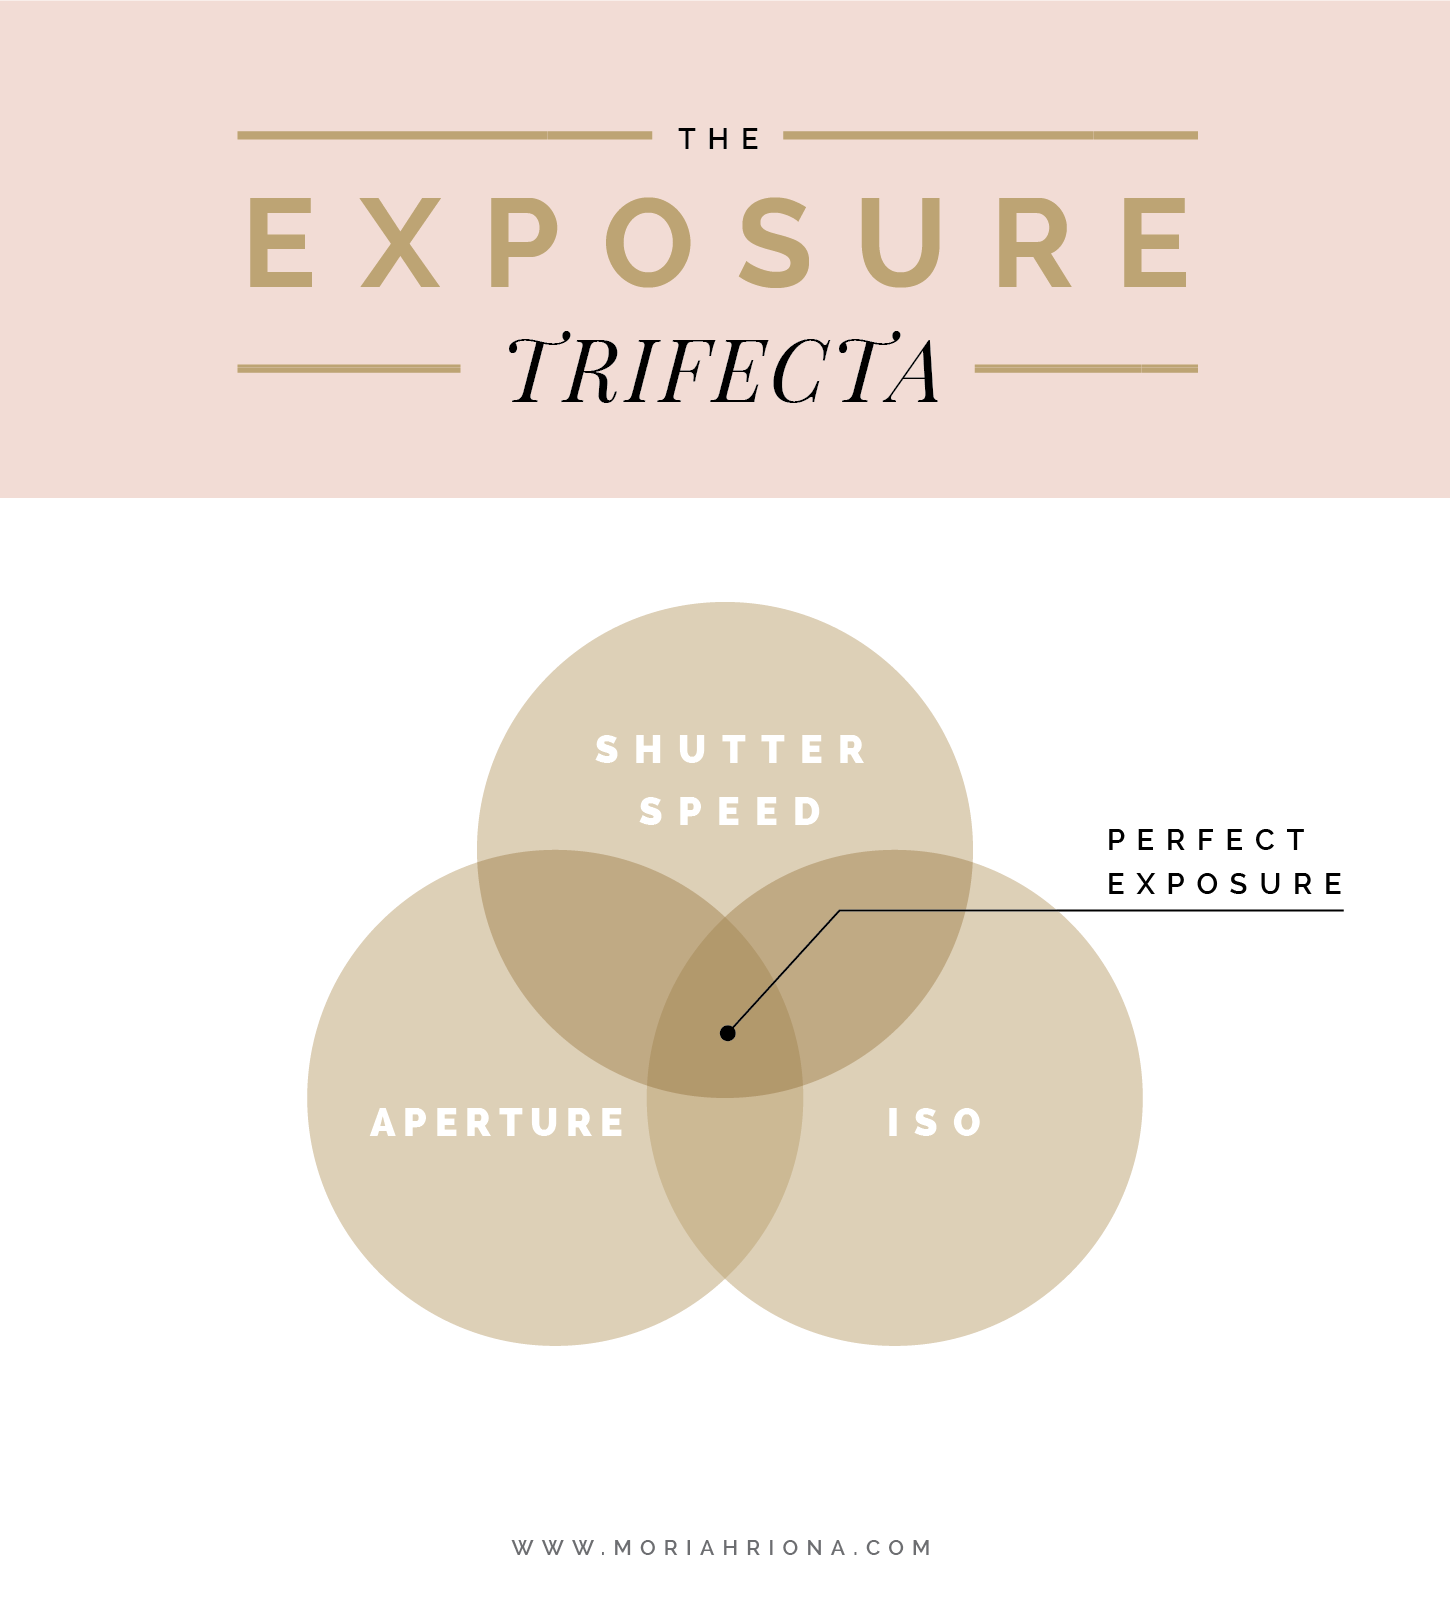
And there you have it, friend. You now know the three ingredients for perfect exposure in all of your images. So set your camera to manual mode, dig out your instruction guide, and start playing around with your Shutter Speed, Aperture and ISO. It will completely revolutionize the way you shoot – and your photographs.
Was this post helpful for you? I sure hope so! And if it was please consider sharing it on Pinterest or Facebook by clicking the links below. Also, let me know if you have any questions in the comment section. Happy snapping, friend!
Ready to rock your photography biz?